Fix for WordPress Comments are closed Error
WordPress comments are closed problem is one of the great problems that WordPress has to deal. This can be fixed by following these tweak settings:
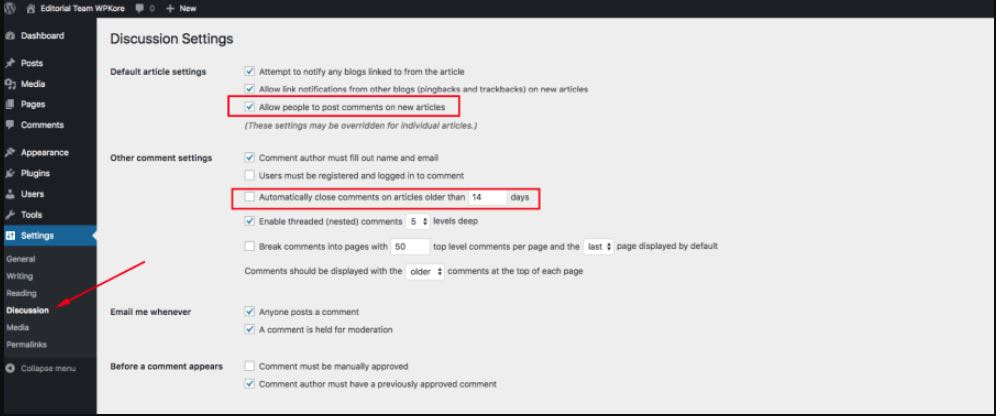
Goto WordPress dashboard and click on Settings >> Discussion tab
WordPress comments are closed problem is one of the great problems that WordPress has to deal. This can be fixed by following these tweak settings:
Goto WordPress dashboard and click on Settings >> Discussion tab
Now check the box Allow people to post comments on new articles and uncheck the box Automatically close comments on articles older than * days and then click the Save changes button.
Now if a particular post says Comments are Closed then go to that Post >> edit and Check the Allow comments.
Now if a particular post says Comments are Closed then go to that Post >> edit and Check the Allow comments.
Removing the Sidebar Links/Widgets in WordPress
When working with a WordPress theme, occasionally, we may forget to completely remove the sidebar links and widgets from the theme. This can be done through the Widgets or by editing the source code of the sidebar.php file in the WordPress Appearance editor.
There are several ways the sidebar widgets can be disabled. This article will explain how to completely remove the sidebar links and widgets through the Appearance editor.
Navigate to Appearance > Widgets. Click here for information on removing and adding widgets.
If for whatever reason, the widget text box is not available or does not work, the code can be commented out to remove the sidebar links and widgets. Commenting the code is good because the original source code is not changed. If the source code is changed and the site breaks, it can be difficult to remember what change broke it, Especially if the code is deleted.
Removing sidebar widgets completely through the code
When working with a WordPress theme, occasionally, we may forget to completely remove the sidebar links and widgets from the theme. This can be done through the Widgets or by editing the source code of the sidebar.php file in the WordPress Appearance editor.
There are several ways the sidebar widgets can be disabled. This article will explain how to completely remove the sidebar links and widgets through the Appearance editor.
Navigate to Appearance > Widgets. Click here for information on removing and adding widgets.
- Log into the WordPress Dashboard
- Navigate to Appearance > Widgets. Click here for information on removing and adding widgets.
- Add a blank text widget. Now the links and widgets will not display.
If for whatever reason, the widget text box is not available or does not work, the code can be commented out to remove the sidebar links and widgets. Commenting the code is good because the original source code is not changed. If the source code is changed and the site breaks, it can be difficult to remember what change broke it, Especially if the code is deleted.
Removing sidebar widgets completely through the code
- Log into the WordPress Dashboard
- Navigate to Appearance > Editor on the left in the WordPress Dashboard.
- On the Edit Themes page, select the sidbar.php page on the right hand side in the Templates section.
- The code for the sidebar.php will load in the Theme editor window. Add a comment to the code like in the snapshot to the right. HTML comments look like the following
htaccess Code for WordPress Multisite
Currently, multisite is easiest to setup under the following conditions:
RewriteBase /
RewriteRule ^index\.php$ - [L] # add a trailing slash to /wp-admin
RewriteRule ^wp-admin$ wp-admin/ [R=301,L] RewriteCond %{REQUEST_FILENAME} -f [OR]
RewriteCond %{REQUEST_FILENAME} -d
RewriteRule ^ - [L]
RewriteRule ^(wp-(content|admin|includes).*) $1 [L]
RewriteRule ^(.*\.php)$ wp/$1 [L]
RewriteRule . index.php [L]
In addition to the above .htaccess code, WordPress multisite requires the following code in your main site’s wp-config.php file:
define('WP_DEBUG', false);
define('WP_ALLOW_MULTISITE', true);
define('MULTISITE', true);
define('SUBDOMAIN_INSTALL', true);
define('DOMAIN_CURRENT_SITE', 'wp-class.com');
define('PATH_CURRENT_SITE', '/');
define('SITE_ID_CURRENT_SITE', 1);
define('BLOG_ID_CURRENT_SITE', 1);
This code should be placed just above the line that says “That’s all, stop editing! Happy blogging.”.
Currently, multisite is easiest to setup under the following conditions:
- WordPress for main site installed in the root directory
- Each additional network site is created in its own subdirectory
RewriteBase /
RewriteRule ^index\.php$ - [L] # add a trailing slash to /wp-admin
RewriteRule ^wp-admin$ wp-admin/ [R=301,L] RewriteCond %{REQUEST_FILENAME} -f [OR]
RewriteCond %{REQUEST_FILENAME} -d
RewriteRule ^ - [L]
RewriteRule ^(wp-(content|admin|includes).*) $1 [L]
RewriteRule ^(.*\.php)$ wp/$1 [L]
RewriteRule . index.php [L]
In addition to the above .htaccess code, WordPress multisite requires the following code in your main site’s wp-config.php file:
define('WP_DEBUG', false);
define('WP_ALLOW_MULTISITE', true);
define('MULTISITE', true);
define('SUBDOMAIN_INSTALL', true);
define('DOMAIN_CURRENT_SITE', 'wp-class.com');
define('PATH_CURRENT_SITE', '/');
define('SITE_ID_CURRENT_SITE', 1);
define('BLOG_ID_CURRENT_SITE', 1);
This code should be placed just above the line that says “That’s all, stop editing! Happy blogging.”.


